

LED strip lighting fixtures have converted domestic lighting fixtures, providing a blend of functionality and aesthetics this is both modern and customizable. Whether you’re aiming to highlight architectural functions, add a cozy environment on your living area, or make a formidable layout statement, LED strip lighting offer an available solution. This guide will stroll you via the method of putting in Install LED Strip Lights On Wall, masking the whole thing from choice to upkeep.
1. Choosing the Right LED Strip Lights for Your Space

Selecting the proper LED strip lights includes information your precise desires. Consider the brightness degree (measured in lumens) to make sure the light output suits your desires, whether or not it’s accessory lighting or general illumination. Explore shade alternatives, from heat white tones to colourful RGB colours, to gain the desired ecosystem. Waterproof alternatives are important for toilets or kitchens, whilst non-water resistant strips are ideal for living rooms and bedrooms. Top brands frequently offer electricity-efficient alternatives with sturdy adhesive backing, making sure toughness and simplicity of set up.
2. Tools and Materials You’ll Need

To ensure a seamless installation, gather the necessary tools and materials. Key items include a measuring tape, scissors (for cutting the LED strip at designated points), and a clean microfiber cloth for preparing the surface. For mounting, strong adhesive tape or clips can secure the lights effectively. You’ll also need connectors, a power adapter, and, optionally, a smart control module for remote operation. Having these items ready prevents mid-project interruptions.
3. Preparing Your Wall for Installation

Preparation is essential to accomplishing a professional end. Start via cleansing the wall thoroughly with a mild detergent to get rid of dust, grease, or particles that might interfere with the adhesive. Dry the surface absolutely to beautify adhesion. Plan the format by marking the meant direction of the LED strip with light pencil lines. This step ensures an excellent distribution and reduces the likelihood of mistakes. Avoid speeding this procedure, as careful coaching will store time later.
4. Measuring and Cutting LED Strip Lights

Accurate measurements are the cornerstone of a clean installation. Measure the period of the wall sections where the lighting fixtures will be set up, and mark the LED strip therefore. Cut the strip at distinctive reduce factors, commonly marked with scissor icons, to avoid detrimental the circuit. If your design requires joining strips, use like minded connectors to preserve electrical continuity. This precision guarantees a elegant and practical result.
5. Wiring and Powering Your LED Strips
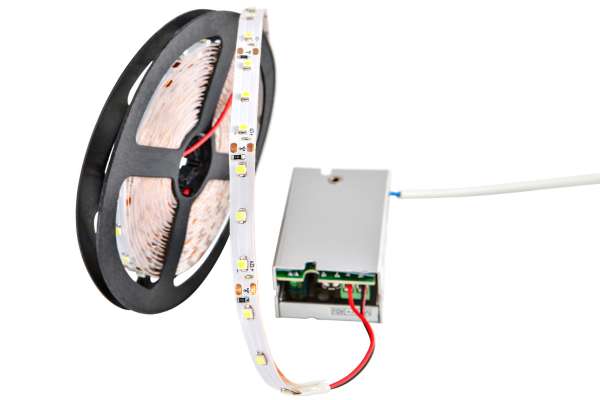
Proper wiring is crucial for protection and performance. Choose a strength adapter that suits the voltage and wattage requirements of your LED strip. Connect the strip to the adapter, making sure polarity alignment. For large installations, take into account the use of a splitter or amplifier to distribute energy calmly. Conceal wires alongside baseboards or behind furnishings for a tidy look. If integrating with a smart machine, follow the manufacturer’s instructions to link the lighting for your Wi-Fi or hub.
6. Mounting the LED Strip Lights to Your Wall

Begin by peeling off the adhesive backing from the LED strip. Apply the strip firmly to the wall, following your pre-marked layout. For textured walls or areas where the adhesive might struggle, consider using mounting clips for added stability. Ensure corners are secured tightly to prevent peeling over time. Work methodically to maintain alignment and avoid creating tension on the strip, which could damage the circuitry.
7. Setting Up Smart Controls for Your LED Strips

Smart controls increase the convenience and versatility of LED lighting fixtures. Many LED strip Lights are well matched with far off controls, cellular apps, or voice-activated systems like Alexa or Google Assistant. Install the accompanying app, pair your lights, and discover features along with dimming, scheduling, and coloration-converting results. These alternatives will let you adapt your lighting fixtures to one-of-a-kind moods and events effortlessly.
8. Testing and Troubleshooting Your Installation
Before finalizing the set up, test the LED strips to ensure proper functionality. Connect the electricity adapter and take a look at for uniform lighting. If any sections seem dim or fail to mild up, investigate the connectors and cut factors for correct alignment. Common issues like flickering or intermittent operation can regularly be resolved through securing loose connections or changing faulty additives.
9. Creative Ideas for Using LED Strip Lights

LED strip lighting fixtures offer limitless creative possibilities. Use them to backlight artwork or mirrors for a dramatic effect. Line the underside of shelves or cabinets to highlight decor or offer assignment lighting. Create a announcement wall via arranging strips in geometric patterns or integrating them into crown molding for a subtle glow. The flexibility of LED strips encourages experimentation to fit your style.
10. Maintaining and Upgrading Your LED Strip Lights
To hold your LED strips looking and functioning their pleasant, smooth them often with a tender, damp fabric to put off dust. Avoid the use of harsh chemical substances that could damage the floor. If a phase becomes damaged, update it with a new strip the use of connectors to keep the layout continuity. Upgrading to greater advanced LED systems, which include those with higher brightness or extra smart features, can refresh your space with out a entire overhaul.
Conclusion
Install LED Strip Lights On Wall is a profitable venture that enhances your house’s ambiance and capability. By cautiously deciding on, preparing, and installing the lights, you can gain a professional-looking result that complements your area. Embrace the creativity and versatility of LED lights, and permit your walls shine with character and fashion.