

I once stared at my ceiling light for ten minutes straight. Not because it was beautiful—but because it stopped working. I tapped it. Nothing. I twisted the bulb. Still nothing. I knew the problem was deeper. The fixture itself had to go. That was my first time dealing with recessed lights. I had no tools, no plan—just a ladder and a lot of hope. I thought it would be hard. It wasn’t. A few steps, a little care, and it was done. Don’t need to call an electrician. You don’t need fancy gear. You just need a clear guide and a bit of courage. Today, I’ll walk you through how to remove recessed light fixture from ceiling. Step by step. Safe. Simple. Clean.
What Are Recessed Lights (or Pot Lights)?
A recessed light is a ceiling light that hides inside the ceiling. Only the trim and the light are visible. It sits flush with the surface, so it looks neat and modern.
Pot light is another name for recessed light. Some people also call them can lights. They all mean the same thing, and you’ll often see them used in spaces like kitchens or with the best recessed lighting for bathroom setups.
LED ceiling lights can look the same but work differently. They use less power and last much longer. Many people are now changing pot lights to LED to save energy.
Before we remove a recessed light fixture, let’s understand what it is. Think of a metal cup pushed into the ceiling. The bulb sits inside. The trim covers the edge. It lights up without hanging down.
Tools You’ll Need
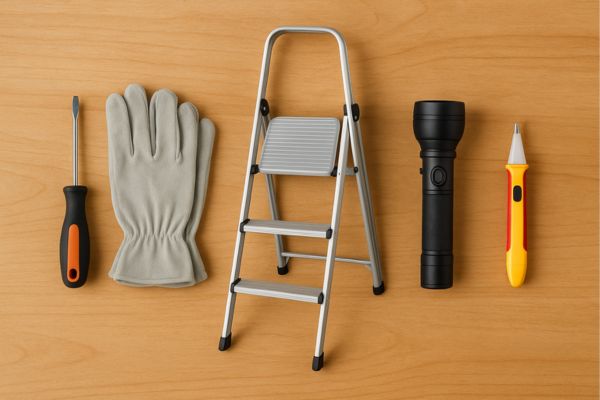
- Screwdriver: Most trims are held by clips or screws. A basic flat-head or Phillips screwdriver helps loosen them without damage.
- Gloves: Dust, sharp edges, or old wires can be tricky. A light pair of gloves will keep your hands safe and clean.
- Ladder: Make sure it’s sturdy and tall enough. A strong step ladder puts you at the right height to see and reach the light.
- Flashlight or headlamp: Some ceiling spaces are dark, even during the day. A flashlight helps you see what’s going on above the trim.
- Voltage tester: This is key. It checks if power is flowing before you touch any wires. Safety comes first.
Step-by-Step Guide
Taking down a recessed light is simple. Just follow these steps with care.
01. Cut the Power
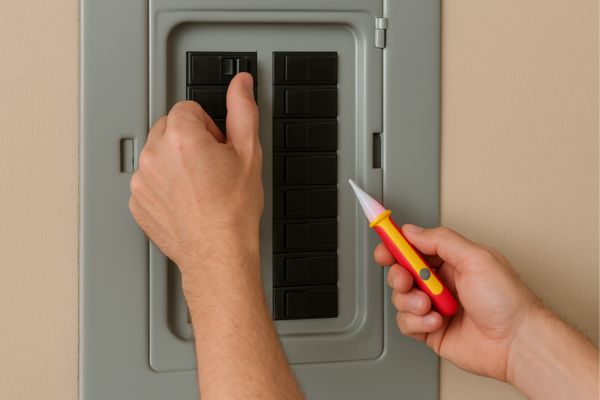
Go to your breaker box. Flip off the switch for that room. Use a tester to check the wires. Make sure there’s no power.
02. Set Up Your Ladder
Pick a ladder that feels strong under your feet. Set it under the light. Keep your tools close by.
03. Take Out the Bulb
Let the bulb cool first. Then twist it out. Place it on a soft surface.
04. Loosen the Trim
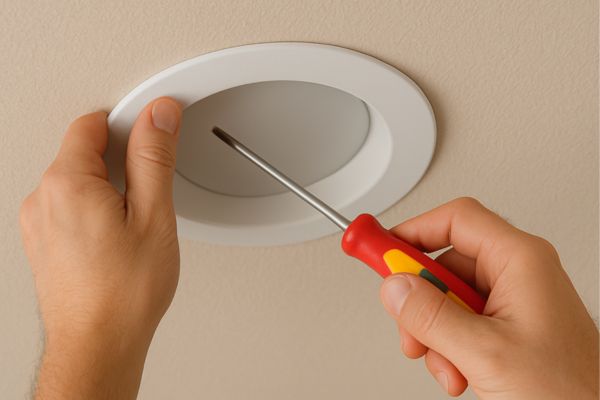
Feel around the edge. Most trims pop out with gentle pressure. Some need a screwdriver to release clips or tabs. Move slow to avoid cracks.
05. Pull Down the Fixture
Look inside the hole. You may see springs, clips, or screws holding the fixture. Release these and slide the light down.
06. Disconnect the Wires
Use a voltage tester one more time. Then unscrew wire nuts or press tabs to release the wires. Pull the wires apart gently.
Common Types of Ceiling Lights & How to Identify Them
Not all ceiling lights are built the same. Knowing the type helps you remove or replace them with ease.
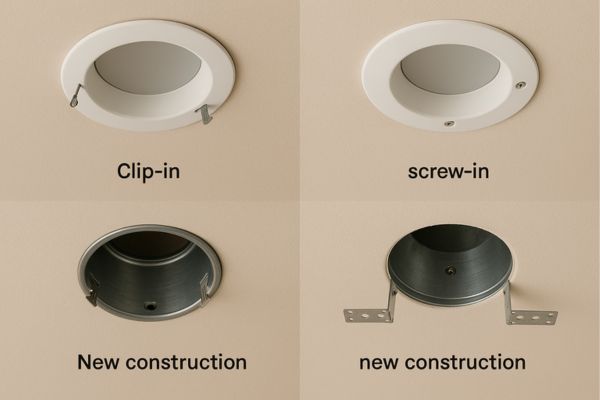
Remodel vs. New Construction Housings
A remodelled housing is made for finished ceilings. It stays in place with metal clips that grab the drywall. You can install or remove it from inside the room.
New construction housing goes in before the ceiling is finished. It attaches to the ceiling joists. Removing it may require attic access or extra work.
Look inside the hole. Remodelled housings usually have clips. New ones often have metal arms or brackets.
Clip-In vs. Screw-In Trims
Clip-in trims are held by spring clips. You can squeeze and pull them out. No tools needed.
Screw-in trims use small screws to stay in place. You’ll need a screwdriver to take them down. These are less common in newer setups.
Knowing your trim type saves time. It also helps you avoid damage.
What to Check Before Changing LED Ceiling Lights
LED ceiling lights come in many shapes and styles. Some are sealed units. Others let you swap bulbs. Some connect by wires. Others use push-in clips.
Before changing LED ceiling lights, check the label or model number. See if the bulb is built-in or replaceable. That tells you what steps to follow next.
Tips to Make the Job Easier
Small steps make a big difference. These tips save time and help avoid mistakes.
Protect Your Paint
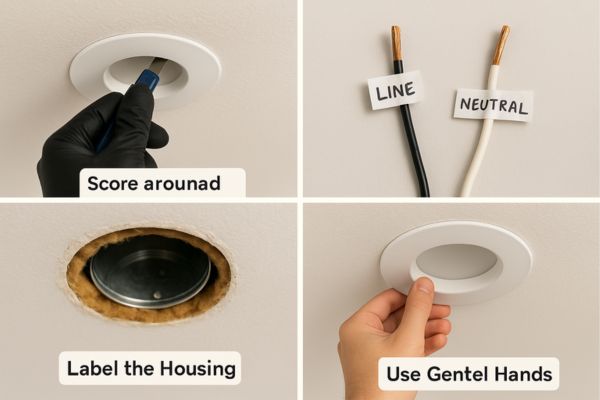
Use a utility knife to score around the trim. Lightly run the blade along the edge before pulling it out. This keeps the paint from peeling.
Label the Wires
Before disconnecting, mark each wire with tape. Write down where it goes. This helps later, especially during upgrades.
Check the Insulation
Look around the housing. See if the insulation is touching the light. Some fixtures can handle it. Others need space to breathe.
Use Gentle Hands
Don’t force anything. Most parts should slide, squeeze, or twist with little pressure. Pulling too hard may bend or crack them.
What’s Next? Installing a New LED Light
Now that you’ve learned how to remove a recessed light fixture from theceiling, maybe you’re ready to install an energy-saving LED one! It makes the room brighter and lowers your power bill.
LED kits are made to fit into old housings. Many snap in with clips or twist into place. No extra tools are needed.
To stay safe, match the wires by colour. Use wire nuts to hold them tight. Push the wires back in and press the light into place.
Turn the breaker on and flip the switch. Your new light should glow right away. Clean. Bright. Easy.
Final Thoughts
You did it. You took the first step, stayed calm, and got the job done. What once felt tricky now feels simple. That’s the power of clear steps and the right mindset. Removing a recessed light fixture from your ceiling doesn’t have to be hard, especially when you know what to do. All it takes is care, basic tools, and a little time. Now you’re ready for the next upgrade. You’ve lit the path—bright and easy.