

I stood in my basement and paused. The space felt dull. Not because of the size or layout. It was the light. A yellow glow from an old tube fixture made the room cold and flat. One quiet Saturday, coffee in hand, I looked up and thought—this needs a change. That’s when I decided to try something new. I would install recessed lighting. I had no experience, just time and curiosity. In this guide, I’ll show you How To Install Recessed Lighting In Drop Ceiling with clear, simple steps. Let’s brighten your space together.
Why Recessed Lighting Works Wonders in Drop Ceilings
Drop ceilings are common in basements, offices, and finished garages. They hide plumbing, wires, and beams—but they can feel flat and lifeless. Recessed lighting changes that. It adds depth. Makes the room feel higher. It spreads light evenly. Best of all, it looks modern and clean.
Tools and Materials You’ll Need
Before starting, gather everything first. It saves you from mid-project store runs (trust me, I’ve been there). Here’s what I used:
- Recessed LED light kits (for drop ceilings)
- Power drill
- Drywall saw or hole saw (check light size)
- Wire stripper
- Wire nuts
- Measuring tape
- Pencil
- Safety goggles
- Circuit tester
- Fish tape or coat hanger
- Electrical wire (usually 14/2 for lighting)
- Voltage-rated gloves
- Junction boxes (if required)
Double-check your recessed lights are “canless” or rated for drop ceilings. Some come with special brackets for grid support.
Step-by-Step Guide: Installing Recessed Lighting in Drop Ceiling
01. Plan the Layout
Good lighting starts with a solid plan. I grabbed some graph paper and sketched out my ceiling grid. Then I marked where I wanted each light. Keep these things in mind:
- Aim for even spacing.
- Stay clear of pipes, beams, and vents.
- Place lights about 4–6 feet apart for balanced brightness.
Stand in the room and look up. Imagine where the light will fall. This helps more than any tape measure.
02. Turn Off the Power
\Safety first. Go to the breaker and turn off the power to your ceiling. Use a tester to make sure the wires are not live. Never guess with electricity—it’s not worth the risk. Want ideas for other rooms too? Check out the best recessed lighting for bathroom to upgrade your bath space the smart way.
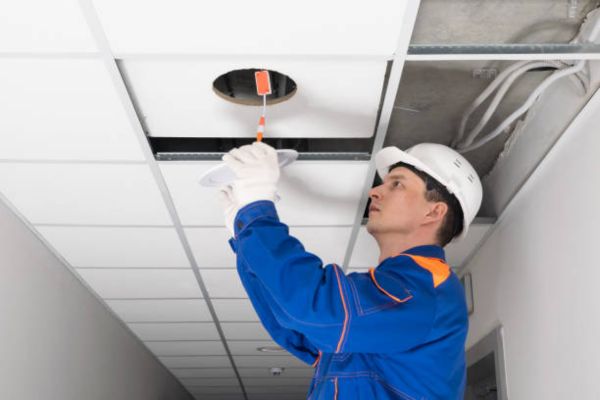
03. Mark and Cut the Holes
Grab your pencil and mark the spots for your lights on the ceiling tiles. Use the template that comes with your light kit. Then, carefully remove the tile and cut the hole using a drywall saw or hole saw.
Pro tip: Cut on a flat workbench, not while the tile is in the ceiling. It keeps the cut clean and your arms pain-free.
04. Run the Wires
This part might feel tricky, but take it slow. Use fish tape or a straightened coat hanger to pull wire from light to light. You’ll also need to run wire from the switch box or power source to the first light.
Make sure you follow your local code. Use the correct gauge wire and secure it properly above the ceiling tiles using clips or zip ties.
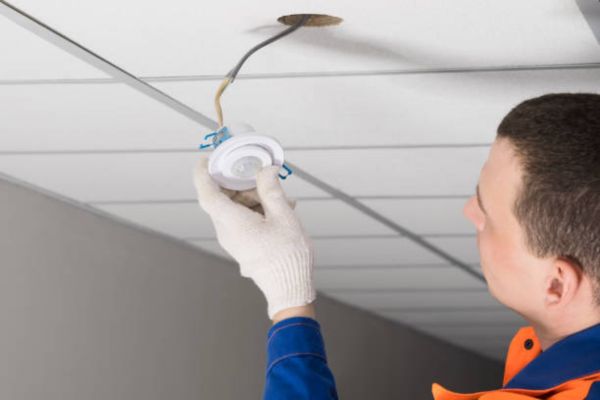
05. Connect the Wires
Now comes the wiring. Most LED kits have push-in connectors. If not, use wire nuts.
Here’s the basic idea:
- Black to black (hot wire)
- White to white (neutral wire)
- Ground to ground (usually bare copper or green)
Tug each wire to make sure it’s snug. Loose wires are a fire hazard. Use electrical tape around the nuts for extra peace of mind.
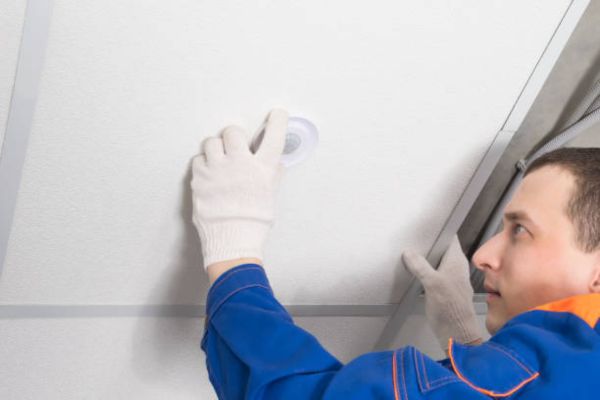
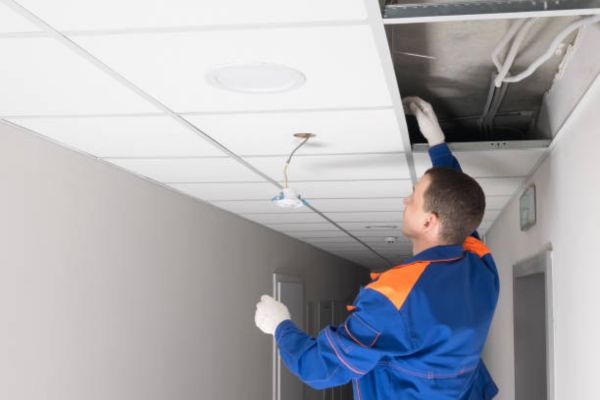
06. Install the Light Fixtures
Insert the light housing into the hole. Most recessed kits have spring clips that snap into place and hold the light snugly against the tile. Push gently but firmly until the clips engage.
Once they’re in, the lights sit flush. That clean look is why I love recessed lighting so much.
07. Test and Adjust
Flip the breaker back on. Hit the switch. Your lights should shine evenly and brightly. If one doesn’t turn on, check the wiring and the breaker again.
Adjust the angle if your kit allows tilt. Some lights let you direct the beam, which is great for highlighting walls or artwork.
Common Mistakes and How to Avoid Them
I made a few blunders on my first go. Learn from me so you don’t have to redo anything. Cutting before measuring twice: I once cut a hole that landed right on top of a ceiling joist. Not fun. Always peek above the tile first.
Overloading the circuit: Don’t plug too many lights into a single circuit. Use a load calculator or ask an electrician if unsure. Using the wrong lights: Not all recessed lights are safe for drop ceilings. Pick low-profile, canless fixtures. They stay cool and fit tight spots.
Practical Tips That Help You Nail It Every Time
Use LED Lights Only
They’re energy-efficient, last longer, and don’t overheat like halogens. Plus, most come with easy connectors and slim housings perfect for drop ceilings.
Buy One Extra Tile
Things go wrong. You may cut one hole too big or crack a corner. Keep a spare tile nearby just in case. It saved me hours on one install.
Mark Your Joists and Obstructions
Before you cut, take a flashlight and look above each tile. Mark any ducts, beams, or wires with painter’s tape. That way, you won’t hit them.
Try a Dimmer Switch
It adds a cozy feel, especially in basements. Make sure your LED lights are dimmable and get a compatible switch.
Take Breaks
Recessed lighting can be a long project. Your arms will thank you for stretching. Drink water. Step back and admire your progress. This is part of the joy.
A Story About Texture—Yes, Even in Lighting
You might wonder, what does “texture” mean when it comes to light?
I’ll tell you.
After I installed my lights, I noticed something magical. The flat, dull walls now had depth. Shadows danced along the brick. Corners no longer felt lost. The light didn’t just brighten the room. It gave it texture. It gave it life. And every time I walk down those stairs now, I smile.
Not just because of how it looks. But because I did it myself.
Final Thoughts
Installing recessed lighting in a drop ceiling might seem like a big job. But with the right tools, a bit of planning, and patience, it’s doable.
And once you’re done, you won’t just have a brighter room. You’ll have a brighter home. So go on—plan your layout, cut your holes, run your wires, and press those lights into place.