

I first installed recessed lights in my living room. The difference was amazing. The space felt bigger, brighter, and more inviting. Since then, I’ve added more recessed lights in other rooms. It’s an upgrade I always recommend. LED recessed lights have many benefits. They use less power, last longer, and create a clean look. These lights sit flush against the ceiling, making a room feel more open. In this guide, I’ll show you how to install LED recessed lighting in an existing ceiling.
What You’ll Need: Tools & Materials
Tools:
- Screwdriver
A screwdriver helps tighten screws and secure your lights. A cordless drill can speed things up. - Wire Stripper
Use this to remove insulation from wires. It’s safer than using a knife. - Voltage Tester
This checks if the power is off. Safety is key!
Hole Saw or Drywall Saw
You need a tool to cut a hole in your ceiling. A hole saw is best for a clean, accurate cut.
Materials:
- LED Recessed Lights
Choose LED lights designed for your ceiling type. Some come with trims, while others don’t. - Junction Box
This box connects the wires safely. It’s essential for the setup.
Wiring
You’ll need electrical wire for the lights. Make sure you use the right gauge.
Safety Gear:
- Gloves
Protect your hands while working with tools and lights. - Goggles
Goggles shield your eyes from dust and debris.
01. Turn off Power
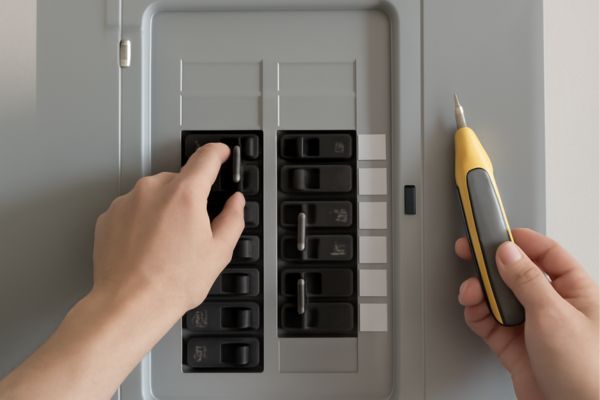
Start by turning off the power At the circuit breaker. This is the most important step for safety. You don’t want To risk an electric shock while working. Double-check that the power is off using a voltage tester.
02. Marking the Placement
Decide where you want the lights to go. Measure and mark the exact spots On the ceiling. Use a pencil to draw A clear outline for each light. This ensures the lights are aligned correctly and evenly spaced.
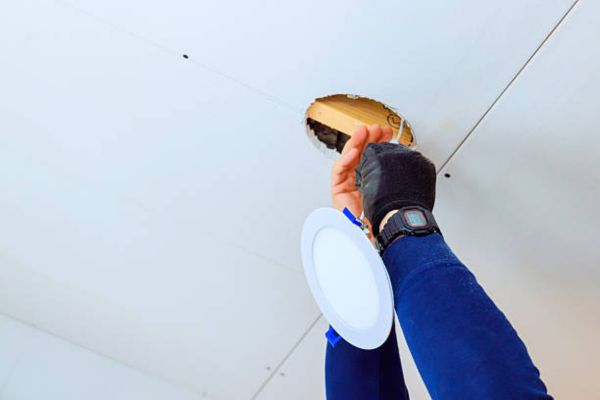
03. Cutting the Hole
Using a hole saw or drywall saw, Cut a hole in the ceiling where you marked. Take your time and cut slowly for a clean, Precise hole. This step is important for making sure the fixture fits properly.
04. Wiring the Fixture
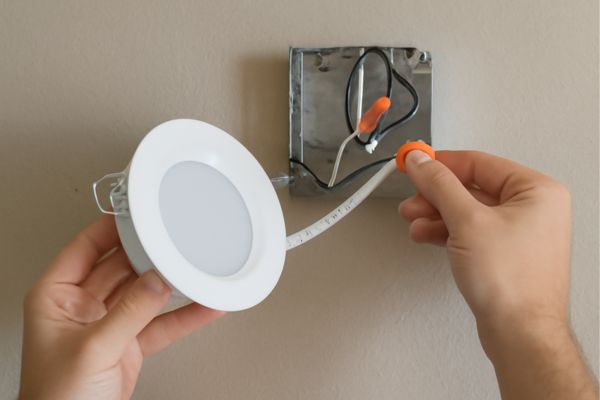
Connect the wires from the light fixture to the junction box. Make sure you follow the manufacturer’s instructions carefully And use wire connectors To secure the connections. Always check that the wires Are firmly in place to avoid any issues later.
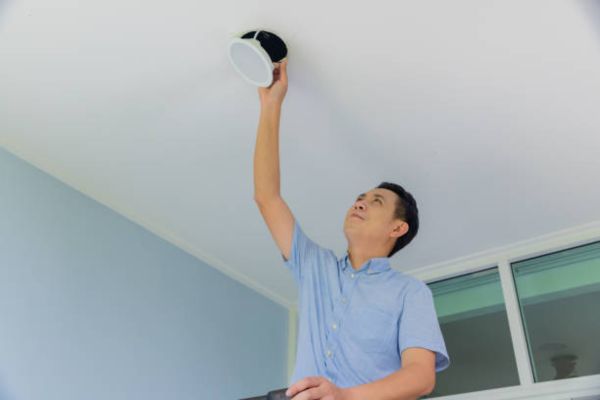
05. Mounting the Fixture
Insert the LED fixture into the hole you cut. Make sure it’s secure. Most LED recessed lights have clips that hold them in place. Press firmly until the fixture fits snugly in the ceiling.
06. Testing Your Installation
Once everything is connected and secured, turn the power back on at the breaker. Test the light to make sure it works. If everything is connected properly, your new recessed lights should light up perfectly.
Troubleshooting: How To Fix Common Issues
How to Fix Flickering LED Lights
Flickering LED lights can be annoying. Often, The cause is a loose connection or A dimmer switch not compatible with LEDs. Start by checking the wiring to ensure it’s properly connected. If you have a dimmer switch, make sure it’s designed for LED lights. Sometimes, switching to A higher-quality LED bulb Or adjusting the voltage can solve the flickering issue.
How to Change Recessed Lighting
Start by turning off the power At the circuit breaker. Remove the old light fixture by unscrewing it from the ceiling. Next, disconnect the old wiring. To replace it with new LED fixtures, simply connect the new fixture’s wiring To the existing junction box. Secure it in place And test the light. Make sure to pick fixtures that are compatible with your ceiling and wiring.
How to Remove a Recessed Light Fixture
Turn off the power at the circuit breaker first. Then, carefully remove the trim or cover Of the fixture. Depending on the fixture, You may need To unscrew or release clips that hold it in place. Once the fixture is loose, disconnect the wiring from the junction box. Carefully lower the fixture from the ceiling And store it safely if you plan to reuse it.
Types of LED Recessed Lights: Which One Is Right for You?
1. Adjustable
Adjustable lights can be tilted to direct light where you need it. These are perfect for task lighting. Use them in areas like kitchens, Bathrooms, Or to highlight artwork. They let you focus light exactly where it’s needed. . For the best recessed lighting for bathroom, consider adjustable lights for perfect illumination in wet areas.
2. Fixed
Fixed lights stay in one position. They offer even, Uniform light across the room. These are great for general lighting in living rooms or hallways. They work well in spaces that don’t need focused light.
3. Baffle Trim
Baffle trims help reduce glare. They provide soft, diffused light. These lights are ideal for bedrooms, living rooms, or any area where you want a cozy atmosphere. They help create a relaxed, Comfortable feel.
Additional Tips for a Professional Look
Ceiling Touch-Ups
After installing the lights, check for any ceiling damage or imperfections. Use a bit of spackle to fill in holes or scratches. Once dry, sand it smooth and paint over any areas that need touch-ups. This small step makes the whole installation look neat and polished.
Ensure Even Light Distribution
Make sure they’re spaced evenly. This will create balanced light throughout the room. Avoid clustering the lights too close together, as this can cause uneven lighting. Aim for a consistent, uniform glow.
3. Clean the Fixtures and Trim
Before finalizing the installation, wipe down the lights and trim to remove any dust or fingerprints. Clean fixtures give a more professional finish. You’d be surprised how much this simple step adds to the overall look!
4. Use the Right Trim
Choose trims that match your room’s style. The trim will frame the light and add a finishing touch. A sleek, modern trim works well in contemporary spaces, while a more decorative trim can suit traditional interiors.
Conclusion
You’ve made it! Your new LED recessed lights are installed, and the transformation is complete. Recessed lighting brings a clean, modern look to any room. Not only does it add style, But it’s also energy-efficient, saving you money in the long run.
Take a moment to appreciate how much brighter And more inviting your space feels. Whether you installed them for better lighting, A fresh look, or both, You’ve created a more comfortable and functional environment.