

You stand at the same stage. A blank ceiling waits. You crave neat light, no bulky cans. This guide shows the way. I wired ten homes from slab to final switch. Each build taught sharp lessons. I share wins and slips with you. You skip my bruises, keep my gains. You will learn layout tips, safe wire moves, and trim hacks. Steps stay short and clear. We list smart tools and cost savers. You see the job from start to glow. Read on to master how to install canless recessed lighting new construction with calm hands. Grab a note pad, sip your tea, and let’s light up your space.
Why Choose Canless Over Cans?
I still laugh thinking about my first ceiling job. Big cans. Tight space. Too many cuts. My arms ached for days. It worked, but barely. Then I found canless lights. Game-changer.
Can lights need a deep metal box. That box holds wires and bulbs. It sits between ceiling joists. It takes space and time. Canless lights skip the box. They’re thin. They snap into place. No frame. No bulk.
Can lights are tough. They last long. They give you bulb options. But they are slow to install. You cut big holes. You brace each one. More parts, more effort.
Canless wins for new builds. With open studs, you drop wire, cut holes, pop them in. That’s it. No brackets. No drilling between beams. Just fast light.
Now, there are times cans still work. Some old homes have space for deep lights. Some people want old-school bulbs. Or big rooms with tall ceilings. That’s fine.
Tools and Materials
These are the must-haves.
- Tape measure – For spacing your lights
- Pencil – To mark where to cut
- Hole saw or drywall saw – To cut your ceiling
- Wire stripper – To prep your cables
- Drill – To guide wires or screws
- Voltage tester – To check the power is off
- Wire connectors – To join wires safely
- Romex cable (14/2 NM) – Standard home wire
- Canless recessed light kit – Match to your ceiling type
Step-by-Step Guide
This part is where the magic happens. No stress, no guesswork. Just clear steps, short words, and a path to a ceiling that glows like a dream
Plan Your Layout
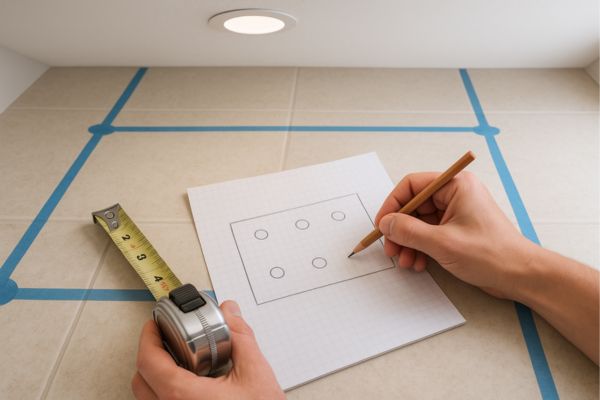
Start with a sketch. Use a tape measure. Mark spots on the ceiling.
Keep lights 4–6 feet apart. Stay about 3 feet from walls. Space them even for a clean look.
Use chalk or painter’s tape on the floor to match the ceiling. It helps you “see” the light before you drill.
01. Mark the Ceiling
Use the paper template from your light kit. Place it where each light goes. Trace the circle with a pencil. Double-check your spacing. Most canless lights need a 4″ hole. Read your kit’s box to be sure.
02. Cut the Holes
Use a hole saw or drywall saw to make your cut — keep it smooth and steady. Let the blade do the work, and hold the tool firm. For a cleaner job and easier cleanup, catch dust with a bucket or bag held under the blade. These steps are crucial when installing the best recessed lighting for bathroom — precision and tidiness go hand-in-hand
03. Run the Wires
Feed 14/2 NM cable through each hole. Start from your power source or switch box. Daisy chain wires from one hole to the next. Leave about 6 inches of wire hanging through each cutout. Drill small holes through studs to guide the wire.
04. Wire Each Light
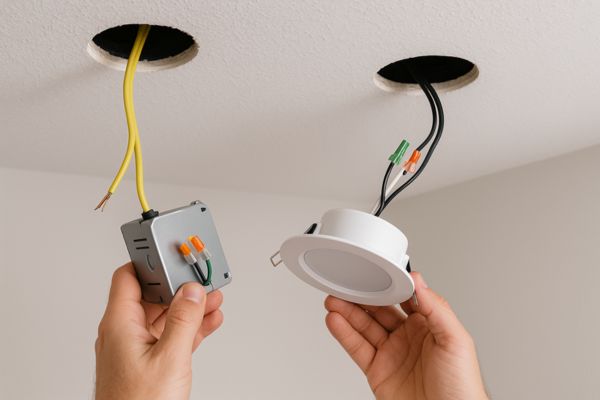
Open the light’s junction box. Slide in the cable. Secure it with a clamp. Strip the ends of the wire. Match color to color—black to black, white to white, ground to ground. Use push connectors or twist-on caps. Snap the cover back on.
05. Install the Light
Plug the light’s cord into the junction box. Push the box up into the ceiling. Squeeze the spring clips and slide the light into the hole. Let the clips snap tight. Push wires up before sliding the light in. That keeps things clean.
06. Test the Lights
Turn power on at the breaker. Flip the switch.
Watch the room light up. No flickers? No dim spots? You nailed it.
Practical Tips for a Clean, Professional Look
A smooth ceiling makes the whole room feel sharp. One crooked light? It ruins the flow. These tips help you nail that pro look, even on your first try.
Common Mistakes to Avoid
Don’t eyeball your layout. That’s the fast road to uneven rows. Don’t forget the voltage test. Even new wires can carry a shock. Pull wires too tight. Leave slack so lights slide in with ease.
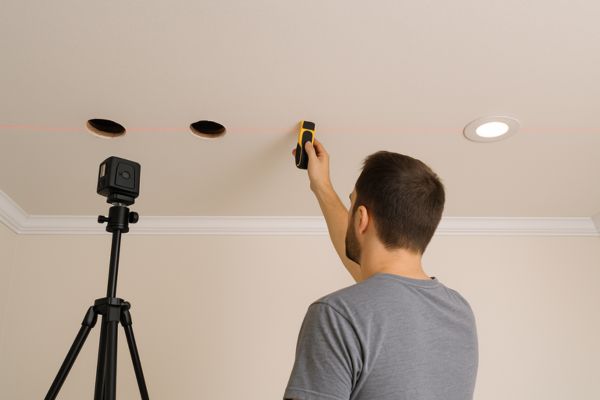
Keep Spacing Even and Lines Straight
Use a laser level for straight rows. Mark all spots before cutting. Step back and check your layout from the ground. It’s easier to fix before holes are cut. Keep lights the same distance apart. Aim for a grid or a smooth arc, based on the room’s shape.
Work Around Joists, Ducts, or Beams
Use a stud finder to map beams. You don’t want to hit wood or metal. Slide your layout slightly if a joist blocks the hole. Even 2 inches won’t throw off the look. For tricky spots, use a gimbal-style canless light. It tilts and swivels to aim the beam where you want it.
Choosing the Right LED Recessed Lights
Before installing LED recessed lighting, you need to pick the right style. Not all lights work the same. Some shine wide, some aim tight, and some shift color with a flip.
Types of LED Canless Lights
Slim lights
Flat and thin. These slip into tight ceilings with ease. Great for most rooms—bedrooms, kitchens, even closets.
Gimbal lights
These tilt and turn. Want to light a painting? Highlight a wall? Gimbals aim where you need.
Color-selectable lights
A small switch on the back lets you pick the glow—warm, cool, or daylight. Good for rooms that change mood, like kitchens or dens.
How to Pick the Right One for Your Space
Think about ceiling height. Low ceilings love slim lights. High ceilings need more power—go for higher lumens.
Check the room’s use. A bright kitchen wants cool light. A cozy bedroom does best with soft warm tones. Match size too. Most homes use 4-inch or 6-inch lights. Stay consistent for clean looks.
Dimming, Color Temp, and Wattage Made Simple
Dimming
Most canless lights work with LED dimmers. Always check the box. Dimming adds comfort and saves power.
Color temp
Measured in Kelvins.
- 2700K = warm, soft
- 3000K = neutral
- 5000K = bright, daylight tone
Wattage
LEDs use less power than old bulbs. A 10-watt LED gives off the same light as a 60-watt bulb. Look for lumens (brightness), not watts.
FAQs
Can I install these myself?
Yes. Most canless lights are made for DIY. Just follow the steps. Use safe tools. Take your time.
Are they safe for insulation contact?
Yes. Many are rated IC, which means “Insulation Contact.” You can install them in ceilings with insulation around them. Always check the box to be sure.
What if I want to add more later?
You can. Just plan your layout now. Leave room for extras. Pull wire with space to spare. Adding later is simple with a bit of prep.
Will they work with smart home systems?
Yes. Look for lights marked “smart compatible” or use a smart switch. Many work with Alexa, Google, and other voice tools.
Conclution
You started with a blank ceiling. Now you see the path to clean, bright light. You’ve learned how to plan, wire, and install. You’ve learned what tools to use and what lights to choose.
Installing LED recessed lighting is no longer a mystery. It’s a weekend win. It’s a glow you can be proud of.