

I still remember the first night I used LED light strips in my bedroom. The light was sharp and cold. It didn’t feel warm or relaxing. I wanted a soft, cozy glow—but what I got was harsh and glaring. That’s when I learned how to diffuse LED light strips. Diffusion makes the light softer and easier on the eyes. It spreads the glow instead of showing sharp dots. The result feels calm, like sunlight through a curtain. In this guide, I’ll show you how to create that perfect bedroom mood with simple tools and a few expert tips.
What Is LED Light Diffusion? (And Why It Matters)
LED light strips shine through small points called hotspots. These dots sit close together on a flexible strip. Each one gives off direct, sharp light. This can look harsh and feel cold in a bedroom.
Diffusion changes that. It spreads the light so it looks smooth. The dots fade into a steady glow. Think of it like frosting a cake or pulling a curtain over the sun.
A good lighting diffuser hides the source and softens the effect. The room feels warm and balanced. It’s easier on the eyes. This kind of soft ambient light helps you relax and sleep better.
Best Places to Use Diffused LED Light Strips
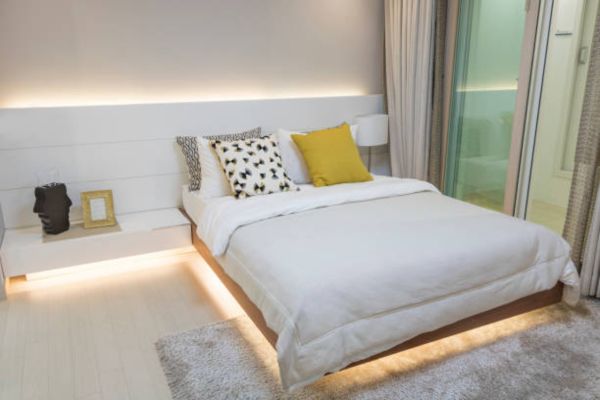
Start under the bed or furniture. This adds soft light to the floor and makes the space feel deeper. It also works well as a low nightlight.
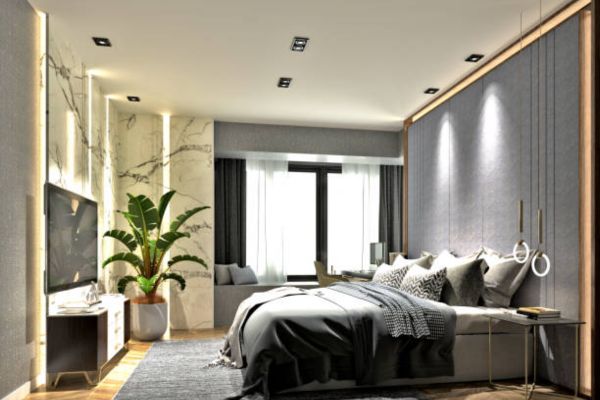
Place strips behind the headboard or TV. The light bounces off the wall and creates a warm edge. It looks clean and modern.
Try them around ceilings or crown molding. The glow moves downward and adds height. This setup gives your room a soft framet.
Use them inside shelves or closets. You get light right where you need it, without glare. This makes your storage look neat and stylish.
How to Diffuse LED Light Strips: Step-by-Step Guide
You don’t need fancy tools to get that soft glow. Just the right setup and a little time. Here’s how to diffuse LED light strips the easy way.
Step 1: Choose Your Diffusion Style

Start by picking a method that fits your space. LED aluminium channels come with frosted covers. These are sleek, strong, and made for strip lights. The cover hides the dots and spreads.
Frosted acrylic sheets work well behind beds or inside shelves. They give off a clean, soft beam. You can cut them to size and mount them flat.
Soft fabric diffusers are great for DIY setups. White cotton or sheer fabric works best. Stretch it over a frame, not touching the strip.
Frosted tubing gives a round light look. Slip the strip inside and seal the ends. It hides the source and blends the glow.
DIY tricks work too. Parchment paper or a trimmed milk jug can do the job. They’re budget-friendly and easy to try.
Step 2: Measure and Prepare
Start with a clean surface. Dust can ruin the hold. Wipe everything down first. Measure the space where the strip will go. Take your time and write it down. Grab what you need: tape, clips, scissors, and a ruler. Lay out your tools so that setup goes fast.
Step 3: Install the LED Strip Properly
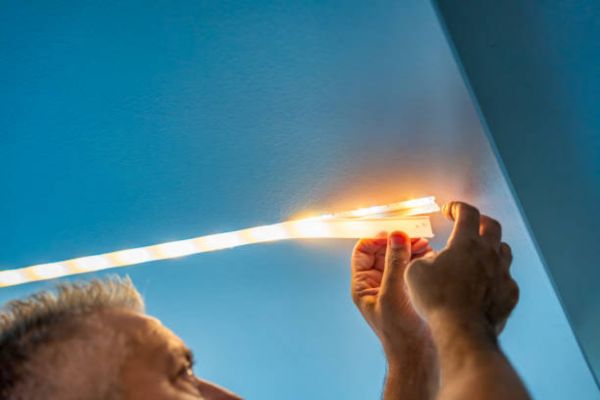
Peel the backing and press the strip down. Keep it firm and even. Don’t twist or fold the strip, as that can damage the lights. Use clips for long runs to keep them flat and straight. For smooth results, always start with the best LED strip lights for bedroom setups that offer quality and flexibility.
Step 4: Add Your Diffuser
Now place your diffuser over the light. Snap on the cover if you’re using a channel. Or slide the strip into the tubing, Stretch fabric tight across a frame. Leave space between the fabric. One or two inches works best. Place acrylic panels with small gaps in front of the strip. This gap spreads the light more evenly
Step 5: Test and Adjust
Turn the light on. Take a step back. Look for dark spots or glare. Move the diffuser if needed. Try angling the strip. Even a small tilt can make a big difference. Play with height and spacing until the glow feels smooth.
Common Mistakes to Avoid
Even a good setup can fall short with small mistakes. Avoiding these will save time and help your lights look better.
Clear covers don’t spread light well. They show the LED dots. Always use frosted covers for smooth, soft light. This is a common harsh LED fix.
Don’t mount the strip right against the surface. Light needs room to spread. A bit of space makes the glow softer and cleaner.
Low-density strips often show gaps. Fewer lights per foot means uneven glow. Choose high-density to fix common LED strip problems.
Test before you lock things in place. A quick check shows dark spots or glare. Skipping this step can lead to wasted time and poor results.
Air needs to flow around. Boxed-in strips can get too warm. This can cause flicker or damage. One of the most overlooked lighting setup tips is to leave space for heat to escape.
Creative Diffuser Ideas from Real Homes
Some of the best lighting ideas come from real spaces—not just design books. Here are a few that worked well in my home and might spark your next DIY LED project.
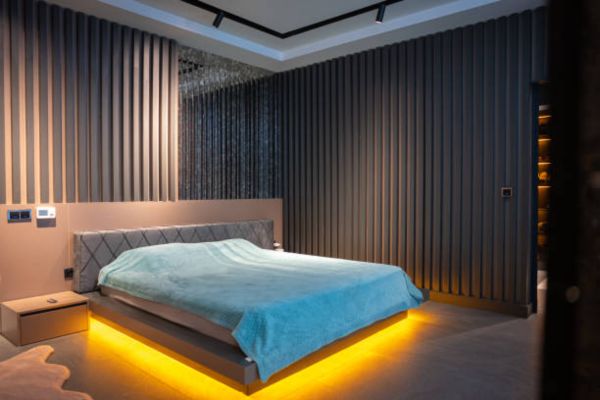
Under the Bed Glow
I added LED strips beneath the bed frame and used frosted tubing to soften the beam. The result? A warm floor glow that feels like it floats. It also makes late-night steps safer and gives the room a cozy base. A simple setup, but still one of my favorite soft lighting setups.
Behind a Wood Wall Panel
I mounted a wood panel behind my reading chair. Then I placed LED strips on the back, facing the wall. A frosted acrylic sheet helped spread. At night, the wall glows like a soft halo behind me. It adds depth without overpowering the space.
Lesson learned: Use warm white strips (2700K–3000K). Cool light made the space feel sterile.
Inside a Bookshelf
This was a weekend project that turned into a favorite. I lined the inside top edge of a tall bookshelf with a strip. I used parchment paper taped under the shelf as a diffuser. It was cheap, fast, and surprisingly pretty. The books now sit in a soft wash of light—no glare, just glow.
This one came straight from a need and turned into one of my best creative lighting ideas.
FAQS
Can I use fabric or paper as a diffuser?
Yes, both can work well. Choose white cotton or sheer fabric. Keep it away from the strip to let heat escape. Paper works too, as long as it’s not touching. These tricks are popular in DIY LED projects for a reason—they’re safe, cheap, and easy.
How far should the LED strip be from the diffuser?
One to two inches is a sweet spot. This small gap helps the light spread better. If the diffuser sits right on top, you may still see dots. A little distance makes the glow look smooth and clean.
Do I need a special power supply for diffused strips?
No special supply is needed just for diffusion. Use the right power source for your strip’s size and voltage. A good power match helps avoid flicker or dim light. Most strips list what they need, so just follow that. This helps prevent LED strip issues later.
Final Thoughts
You don’t need to be a pro to get soft, beautiful lighting. With the right setup, anyone can do this. It’s easier than it sounds—and a lot more fun.
Try different styles. Play with covers, fabric, or DIY tricks. Some will work better than others, and that’s okay. Every space is a little different.
What matters is the result. Diffused add warmth. They create calm. They make your room feel finished and full of comfort. No more harsh glare. Just soft light that makes you want to stay in.
Start small. Pick a corner. Try one method. See the glow change everything.