
I’ll never forget the first time I changed a canless recessed light. One of my ceiling lights went out on a quiet evening. The room felt dim, and I knew I had to fix it fast. At first, I stared at the light, unsure where to start. But I took a deep breath and figured it out. Since then, I’ve done it many times. In this guide, I’ll show you how to change canless recessed lighting with ease. My goal is to help you feel confident and ready to brighten your home.
What Are Canless Recessed Lights?
Its lights are slim light fixtures that sit flat against the ceiling. There is no bulky housing hidden above. The light and trim are built as one piece. This makes the design look clean and simple.
They are not like old-style recessed lights. Traditional recessed lights need a metal can to hold the bulb. That can take up space inside the ceiling. It lets you skip the can, so they fit better in tight spots.
You will see lights in many parts of the home. They work well in living rooms for soft, even light. They brighten kitchens without glare. Many people also use them as the best recessed lighting for bathroom areas. Pick lights that are safe for damp spaces and give the look you want.
Why You Might Need to Change Canless Recessed Lighting
Lights stop working for many reasons. A canless recessed light might flicker or fail. This often means the light has reached the end of its life. Sometimes the wiring connection becomes loose. A quick check can show the cause.
You might also want a fresh look. Many people change their lights to upgrade to brighter or softer options. Others pick energy-saving lights to cut down the power bill. New lights can make a room feel warm and fresh.
How do you know it is time to replace, not repair? If the light keeps failing or flickering, it is better to replace it. A damaged fixture or old model is not worth the risk. A new is easy to install and will last longer.
Tools You’ll Need Before You Start
These will help you stay safe and work with ease. I keep these in a small box so I can grab them fast.
- Ladder or step stool — A sturdy ladder keeps you steady. Make sure it stands firm before you climb.
- Gloves — Soft gloves protect your hands and keep them clean.
- Non-contact voltage tester — This small tool tells you if the power is off. It gives peace of mind.
- New canless recessed light — Pick a quality light that fits your space and style.
Safety comes first. Always turn off the breaker before you touch the light. I also like to double-check with my tester. A few extra seconds can prevent harm.
How to Change Canless Recessed Lighting
Changing light is easier than it looks. Let’s go through it together, step by step. This is how to change in a safe, simple way.
Turn off the power at the breaker box
Find the right breaker and switch it off. This keeps you safe as you work. I always check with my tester to make sure no power flows.
Set up your ladder or stool
Pick a steady ladder or stool. Make sure it stands firm. Take a second to feel balanced before you reach up.
Remove the old light
Grip the trim edge with both hands. Pull down gently. The clips will pop free with light pressure. Work slow to avoid bending the clips.
Disconnect the wiring
You’ll see a simple plug. Unclip it or pull it apart. Some lights use wire nuts—unscrew them with care.
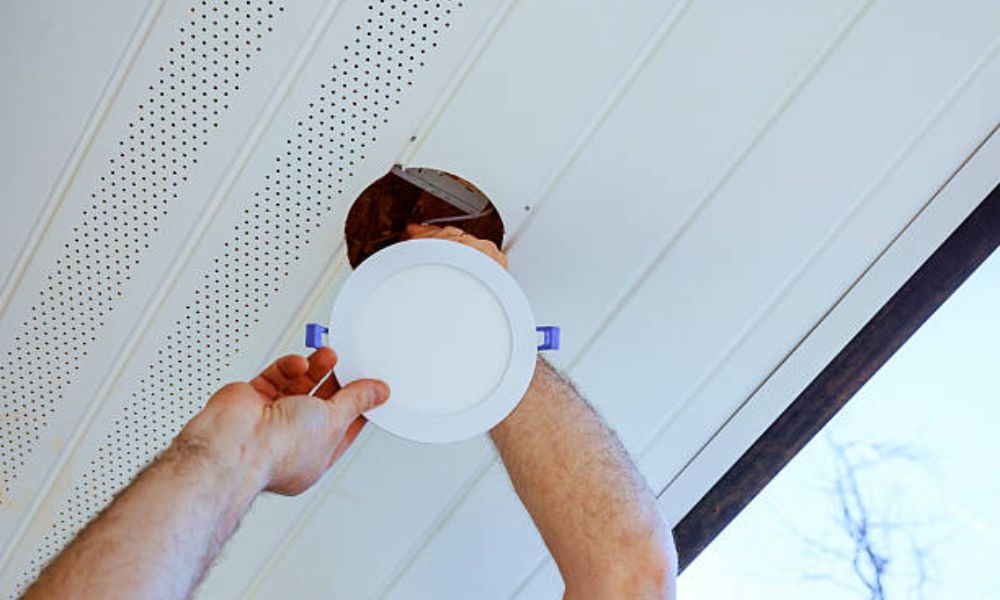
Connect and install the new light
Plug in the new light or twist on the wire nuts. Tuck the wires up into the ceiling. Push the into place until the clips click.
Test and enjoy the fresh glow
Turn the breaker back on. Switch admire your work. The room will feel bright and fresh.
Extra Tips for a Perfect Fit and Finish
Here are some tips I’ve picked up over the years. These small steps can help your new look neat and last longer.
Avoid damage to ceiling paint
Work slow as you pull out the old. Use two hands and even pressure. This helps stop chips or scratches. I also wear soft gloves so I don’t mark the trim.
Check the light’s color temperature first
Before you snap the new light into place, switch on the breaker for a quick test. Make sure the color feels right for the room. I once rushed this step and had to pull the light back out!
Best Recessed Lighting for Bathroom: What I Recommend
Bathrooms need lights that can handle steam and splashes. Look for damp-rated or wet-rated. These are made to work well in moist air. They last longer and stay safe.
Pick a light that is easy to install. They snap in place fast and sit flush with the ceiling. Choose a warm glow for a cosy feel. Go for cool white if you want a fresh, clean look.
Choosing the best recessed lighting for bathroom projects keeps your space safe and stylish. I like lights that give a soft glow but are bright enough for tasks. My favourites are slim, damp-rated models that are easy to clean. They make the room feel open and bright.
When to Call a Pro
But some jobs need a pro. It’s always smart to put safety first.
Call an electrician if the wires look burnt or damaged. Call for help if the light flickers even after you change it. A pro can check for deeper issues in the wiring. It’s also best to get help if you see sparks or smell something odd near the fixture.
There’s no shame in asking for help. A skilled electrician can fix the problem fast and keep your home safe.
Final Thoughts
Now you know how to change, I hope you’ll feel ready to tackle this easy project. It’s a small task that makes a big difference. A fresh light can brighten a room and lift your mood. Give it a try and see how simple it can be.